Changing a file extension in Windows 11 is something most users need at some point, and it is simpler than you might think. The trick is knowing where to start.
To change a file extension in Windows 11, first enable File Name Extensions in File Explorer via View > Show > File name extensions. Then right-click the file, select Rename, change the text after the dot to the new extension, and press Enter. For bulk changes, use Command Prompt or PowerShell.
In this guide, you will learn five methods to change file extensions in Windows 11, using File Explorer, CMD, PowerShell, Save As, and Windows PowerToys. You will also learn how to show file extensions, change them in bulk, and fix common problems when renaming fails.
Important: Renaming vs Converting a File Extension
Before you start, understand this critical difference; most guides skip it entirely.
Renaming a file extension changes the label at the end of the filename (like .txt to .html). It tells Windows which program to use to open the file. But it does NOT change the actual file content.
Converting a file actually rewrites the internal data into a new format. This is done through a program’s Save As function or a converter tool.
When to rename:
- Changing .txt to .html when the file already contains HTML code
- Changing .jpg to .jpeg for compatibility
- Fixing an incorrectly labelled extension
When to convert (use Save As instead):
- Changing .doc to .pdf
- Changing .png to .jpg
- Changing .xlsx to .csv
If you only rename a file without converting it, the file may fail to open or behave unpredictably. Always back up your files before changing any extension.
Step 1: How to Show File Extensions in Windows 11
Windows 11 hides file extensions by default. You must make them visible before you can edit them. This is the first step for every method below.
Method A — Via File Explorer (Quickest):
- Press Win + E to open File Explorer
- Click View in the top menu bar
- Hover over Show
- Click the File name extensions to check it on
Extensions such as .txt, .jpg, and .docx will now appear next to every filename.
Method B — Via Folder Options:
- Open File Explorer
- Click the three-dot menu (⋯) in the top bar
- Select Options
- Click the View tab
- Uncheck “Hide extensions for known file types.“
- Click Apply, then OK
Both methods do the same thing. Use whichever feels faster for you.
Method 1: Change File Extension in Windows 11 Using File Explorer
This is the standard method. It works for changing one file at a time.
Steps:
- Press Win + E to open File Explorer.
- Navigate to the file you want to change.
- Make sure file extensions are visible (follow Step 1 above)
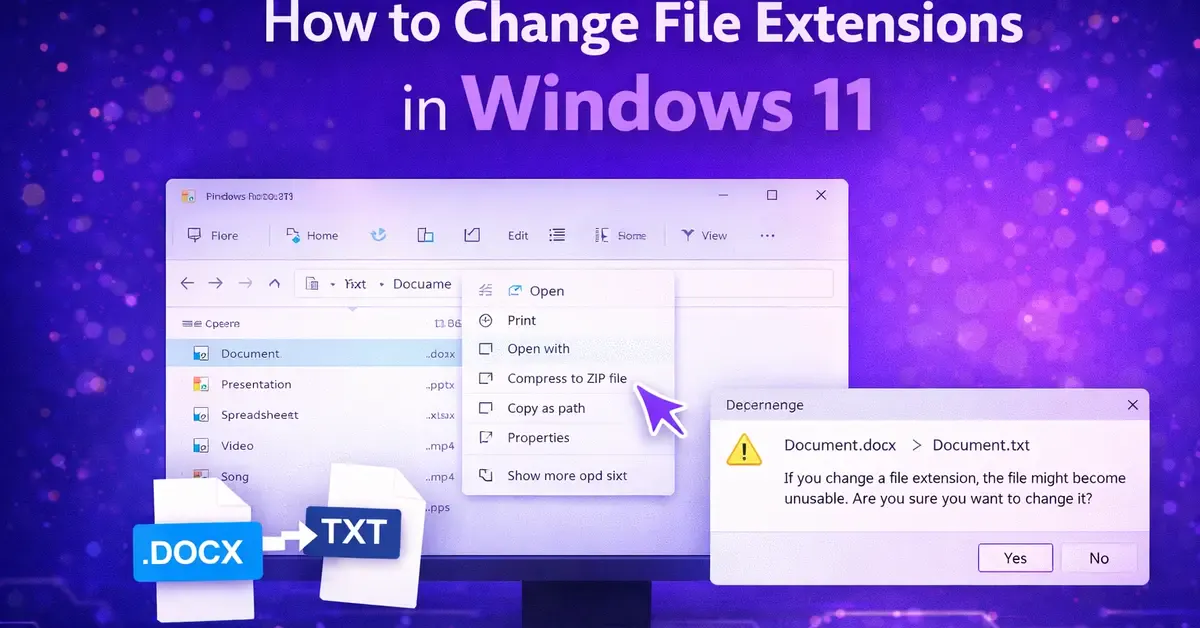
- Right-click the file and select Rename, or click the file once and press F2.
- The filename becomes editable, including the extension.
- Delete the current extension (the part after the last dot)
- Type the new extension, for example, change document.txt to document.html
- Press Enter
- A warning will appear: “If you change a file name extension, the file might become unusable. Are you sure you want to change it?”
- Click Yes to confirm
Your file now shows the new extension. Open it to confirm it works as expected.
Pro tip: Click only on the extension part, not the full filename, so you do not accidentally rename the whole file.
Method 2: How to Change File Extension in Windows 11 Using CMD
Command Prompt is perfect for changing a single file extension quickly or renaming multiple files in bulk. This is the go-to method for developers and power users.
Change a Single File Extension via CMD
- Press Win + R, type cmd, and press Enter
- Navigate to the folder containing your file using the cd command: cd C:\Users\YourName\Documents
- Type the rename command: ren oldfilename.txt newfilename.html
- Press Enter
The file extension changes instantly. No confirmation prompt appears in CMD.
Change File Extension Windows 11 Multiple Files via CMD
To rename all files of one type in a folder at once, use the wildcard *:
ren *.txt *.html
This converts every .txt file in the current folder to .html in a single command.
To rename all files in a folder and all its subfolders, use the forfiles command:
forfiles /S /M *.txt /C “cmd /c rename @file @fname.html”
- /S — includes all subfolders
- /M *.txt — targets files with the .txt extension
- @fname.html — renames each file to the same name with .html
Always navigate to the correct folder first using cd before running bulk commands. Running these commands in the wrong directory will rename files you did not intend to change.
Method 3: Change File Extension in Windows 11 in Bulk Using PowerShell
PowerShell is more powerful than CMD for bulk file tasks. It handles large batches of files cleanly and gives you more control over filters and conditions.
Change All Files of One Type in a Folder
- Press Win + X and select Terminal (Admin) or Windows PowerShell (Admin)
- Navigate to your folder: cd C:\Users\YourName\Documents
- Run this command to change all .txt files to .html:
Get-ChildItem -Filter *.txt | Rename-Item -NewName { $_.Name -replace ‘\.txt$’, ‘.html’ }
Change a Single File Extension via PowerShell
Rename-Item -Path “C:\Users\YourName\Documents\report.txt” -NewName “report.html”
Change Extensions in All Subfolders (Recursive)
Get-ChildItem -Filter *.txt -Recurse | Rename-Item -NewName { $_.Name -replace ‘\.txt$’, ‘.html’ }
The -Recurse flag digs into every subfolder automatically.
Safety tip: Add -WhatIf to the end of any PowerShell rename command to preview the changes before they happen, without actually renaming anything:
Get-ChildItem -Filter *.txt | Rename-Item -NewName { $_.Name -replace ‘\.txt$’, ‘.html’ } -WhatIf
Remove -WhatIf once you are happy with the preview.
Method 4: How to Change Excel File Extension in Windows 11 (and Other Office Files)
For Office files like Excel, Word, and PowerPoint, do not just rename the extension. Office formats have specific internal structures. Renaming .xlsx to .csv will not create a true CSV file; the file will likely fail to open.
Instead, use Save As inside the application to properly convert the format.
How to change the Excel file extension in Windows 11:
- Open your file in Microsoft Excel
- Click File in the top left
- Select Save As
- Choose your save location
- Click the “Save as type” dropdown
- Select your desired format (e.g., .csv, .xlsx, .xlsm, .pdf, .xls)
- Click Save
Common Excel format conversions:
- .xls → .xlsx (upgrade to modern format)
- .xlsx → .csv (export data for use in other tools)
- .xlsx → .pdf (for sharing a read-only version)
How to change a .txt file extension in Windows 11 to another format:
For simple text files, renaming works fine for compatible formats. To convert a .txt file to .docx, open the .txt file in Word, then use File > Save As and select Word Document (.docx).
Method 5: Change File Extension in Windows 11 in Bulk Using Windows PowerToys
Windows PowerToys is a free Microsoft tool that adds powerful file management features to Windows 11, including a PowerRename utility that makes bulk extension changes easy without typing a single command.
How to install PowerToys:
- Open the Microsoft Store
- Search for PowerToys
- Click Install. It is free and made by Microsoft.
How to use PowerRename to change file extensions in bulk:
- Open File Explorer and select all the files you want to rename
- Right-click and select PowerRename
- In the Search box, type the old extension: .txt
- In the Replace with box, type the new extension: .html
- Check “Use regular expressions” if needed for complex patterns
- Preview the changes in the list below
- Click Apply
PowerToys is the easiest way to change file extensions in Windows 11 in bulk without using the command line. It shows a live preview before anything changes, so it is much safer than CMD for less technical users.
How to Change .txt to .exe in Windows 11
Changing .txt to .exe is possible but requires extra caution. An .exe file is an executable program. Renaming a text file to .exe will not make it run; the file must actually contain executable code for it to run.
Developers and security researchers commonly use this to inspect or analyse executable files safely as text.
Steps:
- Show file extensions (follow Step 1)
- Right-click the .txt file and select Rename
- Change the extension from .txt to .exe
- Press Enter and click Yes to confirm
Warning: Never rename a .txt file to .exe unless you know exactly what the file contains. Running an unknown .exe file can harm your computer. Only do this with files you created yourself or fully trust.
Troubleshooting: Why Can’t I Rename a File Extension?
This is one of the most common problems users run into. Here are the main causes and fixes:
Problem 1: File extensions are hidden: The most common reason. Windows hides extensions by default. If you rename document.txt when extensions are hidden, the file becomes document.txt.txt — the original extension is still there, just invisible.
Fix: Enable “File name extensions” in File Explorer via View > Show > File name extensions before renaming.
Problem 2: The file is open in another program: Windows locks files that are currently in use. You cannot rename them.
Fix: Close the file in all applications, then try renaming again.
Problem 3: You don’t have permission: Some files, especially system files, are protected by Windows and cannot be renamed without administrator rights.
Fix: Right-click the file, select Properties > Security, and check your permissions. For CMD bulk operations, open CMD as an administrator.
Problem 4: Windows 11 update broke the rename method: Some Windows 11 updates (particularly build 22631+) changed how File Explorer handles extensions. Users reported that after renaming, files got double extensions like file.html.txt.
Fix: Make sure “File name extensions” is enabled AND “Hide extensions for known file types” is unchecked in Folder Options. Both settings must be correctly set for renaming to work properly.
Problem 5: The file is a system or read-only file: Read-only files cannot be renamed directly.
Fix: Right-click the file, select Properties, and uncheck Read-only. Click Apply and try renaming again.
Just like how tweaking settings on other platforms requires knowing the right menu, whether you are changing the order of Instagram posts or adjusting slide size in Google Slides, Windows 11 file extension changes become effortless once you know exactly where to look.
FAQs
How do I see file extensions in Windows 11?
Open File Explorer, click View in the top menu bar, hover over Show, and click File name extensions. This makes file extensions such as .txt, .jpg, and .docx visible next to every filename.
How do I force a change to a file extension?
Show file extensions first via View > Show > File name extensions. Then right-click the file, select Rename, change the extension after the dot, press Enter, and click Yes when Windows warns you. If the file is locked or protected, close it in all programs first. For read-only files, right-click > Properties and uncheck Read-only before renaming. For system-protected files, open CMD as administrator and use the ren command.
How to change .txt to .exe in Windows 11?
Enable file extensions in File Explorer, right-click the .txt file, select Rename, and change .txt to .exe. Press Enter and confirm. Be very careful, this does not create a working executable unless the file already contains actual executable code.
Can I change a file extension without losing data?
Yes, if the new extension is compatible with the file’s actual format. For example, renaming .jpeg to .jpg is safe because both refer to the same image format. However, renaming .png to .jpg does not convert the image; it just changes the label, and some programs may struggle to open it correctly.
What is the fastest way to change file extensions for hundreds of files in Windows 11?
Use Command Prompt with the command ren *.oldext *.newext for files in a single folder. For files across multiple subfolders, use the PowerShell command Get-ChildItem -Filter *.oldext -Recurse | Rename-Item -NewName { $_.Name -replace ‘\.oldext$’, ‘.newext’ }.
Conclusion
Changing file extensions in Windows 11 is a small skill that saves a lot of time. The method you choose depends on how many files you need to change and how comfortable you are with the command line.
For a single file, File Explorer is the fastest option. For dozens or hundreds of files, CMD or PowerShell handles the job in seconds. For Office files like Excel or Word, always use Save As inside the application to properly convert the format, not just rename.
The most important habit: always enable file name extensions before you start, and always back up files before making bulk changes. Those two steps prevent 90% of problems users run into.